The Pro Platform Changelog

See updates, new features, upcoming changes and more!
Subscribe to updates
© 2025 The Pro Platform Changelog

Calendar

Mar 01, 2024

Overview

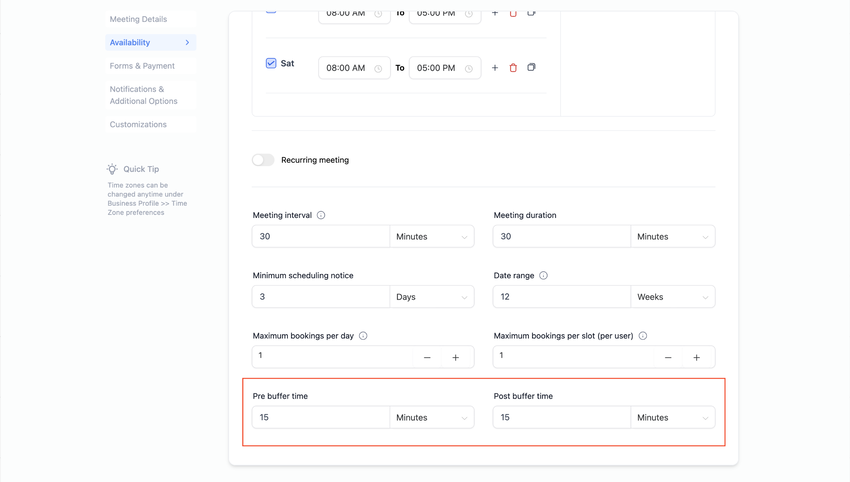
Buffers represent additional time that can be added before and/or after an appointment. Previously, calendars only had post buffers. We are now excited to introduce pre-buffers as well, allowing you more flexibility.

What's New?

  • You can now add both pre and post buffers for an appointment. Pre buffers added before an appointment whereas post buffers added after an appointment.
  • Adding this would allocate buffer time to be considered when scheduling any new appointments.
  • This feature can be beneficial if you need extra time to get ready before an appointment, or wind down after a presentation.

Important points to note:

  1. Buffers only apply to events booked through the booking widget or directly from the app. However, events created outside the app (e.g., Google, Outlook, iCloud) are taken into consideration when finding a free slot while scheduling a meeting with a buffer from the widget / app. This means that buffers cannot overlap with any other existing calendar event.
  2. If there's a 30-minute appointment with15-minute buffers before and after, someone else booking on the same day will see an available slot 30 minutes after the existing booking. This is due to two buffers being applied consecutively, as there will be a 15-minute post buffer for the existing appointment and a 15-minute pre-buffer for the new appointment.

How to Use?

  1. Choose the calendar to which you want to add buffers for appointments.
  2. Navigate to the "Availability" section.
  3. Specify the duration you want for both the pre and post buffers and click on save.
Mar 01, 2024

Summary

You now have enhanced control over the communication preferences for third-party calendars (Google and Outlook) regarding sending invitation and appointment update emails. This feature empowers you to manage how you communicate with your event attendees more effectively.

What's New?

  • Previously, you could only regulate whether Google Calendar should send appointment emails (invitations and updates) to attendees.
  • Now, you can also control whether Outlook should send emails from its platform. This expansion provides you with additional flexibility in managing your communication preferences.

How to Use?

To utilize this feature, follow these steps:

  1. Navigate to calendar settings.
  2. Locate and click on "Notifications & Additional Options."
  3. Check the box labeled "Allow Google/Outlook to send invitation & update emails to attendees" to enable or disable notifications from the respective third-party calendars.
Feb 09, 2024

Summary

In this release, we are excited to introduce enhancements to calendar availability settings. Users now have greater flexibility with the ability to indicate 24-hour availability from 12:00 am to 12:00 am.

What's New?

  • 24-Hour Availability: You can now set your availability from 12:00 am to 12:00 am, indicating continuous availability for a full 24-hour period.
  • Extended End Time: End times can now be set to 12:00 am with any other start time. Previously, the end time was restricted to 11:55 pm, which could lead to the last slot not being displayed. With this enhancement, for a calendar duration of 15 minutes and 15-minute intervals, the last available slot will now be correctly shown as 11:45 pm, ensuring users do not miss out on desired appointments.

Important Note:

  • Users can only set 12:00 am to 12:00 am as the same start and end time for 24-hour availability. Setting identical start and end times for other hours, such as 8:00 am to 8:00 am, will not be allowed. In such cases, for example, users should set availability for the period from 8:00 am to 12:00 am on Mondays and from 12:00 am to 8:00 am on Tuesdays.

How to Use?

  • Navigate to calendar settings.
  • Select 'Availability'.
  • Choose your preferred days and time slots.
  • Add your availability accordingly.