The Pro Platform Changelog

See updates, new features, upcoming changes and more!
Subscribe to updates
© 2025 The Pro Platform Changelog

Improved

Jun 10, 2024

We're thrilled to announce our latest update to our Mobile App! This update brings a bunch of improvements and fixes that further improve the usability of the Pro Platform mobile app.

🚀 What's New

  1. Updated notification badge logic: Badge count now reflects the number of unread notifications, not unread conversations.
  2. Persistent Filters on Conversations and Tasks: Filters applied on the Conversations and Tasks page of the mobile app will retain their selections made by the user until the user decides to change or remove them.
  3. Seamless creation of CRM contacts from native contacts: If a call is made from device native quick actions (Long press the icon on your device's app drawer/home screen and tap on "Make a Call")
  4. Enhanced features for Documents and Contracts: Any documents created on web will be seamlessly accessible on mobile and vice versa.
  5. Fixed call duration reset glitch: Often, if you were to rotate your device from Portrait to Landscape, the call duration would reset to 00:00. This has been fixed now.

👷‍♂️ Notification Count - How It Works

  1. Open the mobile app.
  2. Once you are on the notifications section, you can click on any unread notification to view it.
  3. Upon reading the notification, the badge count will decrease by a count of 1.
  4. To clear the badge count entirely, tap on the 3-dots icon on the top right and tap on "Mark all notifications as read". This will clear the badge count on your device.

⭐️ Why it Matters

This update finally clears the air on how the badge count is calculated, so that you can get an accurate count on the number of unread notifications.

⏱️ Availability

  • Pro Platform (iOS, Android) - v3.74 or later
Mar 22, 2024

Overview

We're excited to share improvements to the conversations module, specifically addressing the email messages experience. Our goal is to ensure a seamless and efficient interaction with email messages, recognising the importance of quick and reliable access to email content.

Email View Freezing: Customers experienced occasional freezing when clicking on email messages, caused by delays in fetching email content, which took an average of 2-3 seconds.

We've addressed this issue by improving the message load time within email threads, enhancing the overall user experience.

This enhancement is a step towards optimizing user experience on the conversations screen, ensuring smoother customer interactions and bolstering the performance overall.

Mar 08, 2024

What's New:

We've implemented a subtle yet impactful improvement by displaying the phone number alongside each user, streamlining the configuration process within the IVR. This enhancement is designed to make the setup more intuitive and user-friendly, empowering our users with an enhanced level of control.

Impact

  1. User-Friendly Configuration: Now, users can effortlessly configure the IVR with the phone number conveniently presented next to each user, ensuring a seamless and efficient experience.
  2. Enhanced Visibility: The addition of phone numbers provides clear and concise information, allowing users to make informed decisions during IVR setup.

User Selection Optimization:

To further refine the user experience, we've disabled the selection of users who do not have an associated phone number in the Connect Call action. This ensures that the call forwarding process remains efficient and avoids any potential roadblocks that may arise in the absence of a phone number.

Mar 02, 2024

Overview

We have added the ability to expand the messaging box when writing emails on the contacts detail page. This makes it much more user friendly when typing out long emails. We added this feature in direct response to users inquires!

How to use

Go to the contacts tab and select a contact. Once one the contact details page select "email"

The click the expander icon

Boom! Now you have more room to type! We hope this helps when typing out longer emails!

Mar 01, 2024

Overview

We're thrilled to announce an enhancement to our existing feature. You can now add up to five email domains for email types: Workflow, 1:1, Campaign, and Bulk emails. With that error notification was provided if a domains lacks a default header, helps avoid potential DMARC and other deliverability issues.

Here's how to access this Feature:

Settings - Email Service -> SMTP Service -> Dedicated Domain and IP -> Domain Configuration.

Key Benefits:

Improved Deliverability: By spreading email sending volume across multiple domains, reduce the risk of triggering spam filters or being marked as spam by internet service providers (ISPs). This can lead to better inbox placement and higher deliverability rates.

Reduced Risk of Blacklisting: If one sending domain gets blacklisted or flagged for spam, having multiple domains ensures that entire email marketing operation won't be affected.

Distributed Workload: Distributing email sending workload across multiple domains can prevent overloading any single domain and ensuring consistent performance.

Upcoming:

The sending domain can be selected for individual workflow, campaign and bulk email level.

Mar 01, 2024

Overview

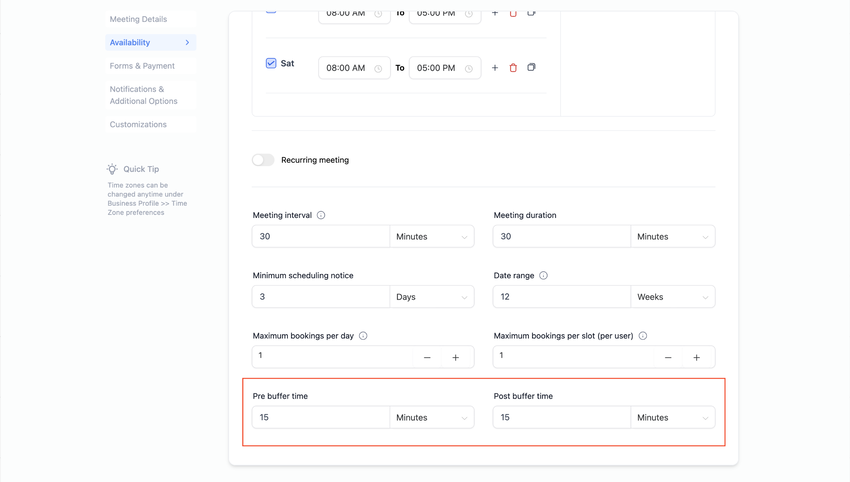
Buffers represent additional time that can be added before and/or after an appointment. Previously, calendars only had post buffers. We are now excited to introduce pre-buffers as well, allowing you more flexibility.

What's New?

  • You can now add both pre and post buffers for an appointment. Pre buffers added before an appointment whereas post buffers added after an appointment.
  • Adding this would allocate buffer time to be considered when scheduling any new appointments.
  • This feature can be beneficial if you need extra time to get ready before an appointment, or wind down after a presentation.

Important points to note:

  1. Buffers only apply to events booked through the booking widget or directly from the app. However, events created outside the app (e.g., Google, Outlook, iCloud) are taken into consideration when finding a free slot while scheduling a meeting with a buffer from the widget / app. This means that buffers cannot overlap with any other existing calendar event.
  2. If there's a 30-minute appointment with15-minute buffers before and after, someone else booking on the same day will see an available slot 30 minutes after the existing booking. This is due to two buffers being applied consecutively, as there will be a 15-minute post buffer for the existing appointment and a 15-minute pre-buffer for the new appointment.

How to Use?

  1. Choose the calendar to which you want to add buffers for appointments.
  2. Navigate to the "Availability" section.
  3. Specify the duration you want for both the pre and post buffers and click on save.
Mar 01, 2024

Summary

You now have enhanced control over the communication preferences for third-party calendars (Google and Outlook) regarding sending invitation and appointment update emails. This feature empowers you to manage how you communicate with your event attendees more effectively.

What's New?

  • Previously, you could only regulate whether Google Calendar should send appointment emails (invitations and updates) to attendees.
  • Now, you can also control whether Outlook should send emails from its platform. This expansion provides you with additional flexibility in managing your communication preferences.

How to Use?

To utilize this feature, follow these steps:

  1. Navigate to calendar settings.
  2. Locate and click on "Notifications & Additional Options."
  3. Check the box labeled "Allow Google/Outlook to send invitation & update emails to attendees" to enable or disable notifications from the respective third-party calendars.
Feb 20, 2024

Overview

We’ve enhanced the new user creation, enabling newly created users to set their passwords before logging into their accounts. This update prevents admins from setting a password for new users or sharing it via email.

This change was implemented based on customer feedback and to mitigate the negative impact the previous flow had on the domain's reputation.

What’s New:

  • Admins can now create new users without having to set a password for them.
  • Newly created users will receive an invitation email without password information (unlike before) and a call-to-action (CTA) to proceed with account activation and login.
  • Upon clicking the CTA, users are prompted to set a password for themselves.
  • After setting the password, users can log in to their account using their email and the newly created password.

Note:

If the user hasn’t received the Activation email or the Activation email expired. Admin can send the email again by triggering it from the Teams/My Staff page by clicking on the Verification Email button. This button will be available until the user set the password.

Feb 09, 2024

Summary

In this release, we are excited to introduce enhancements to calendar availability settings. Users now have greater flexibility with the ability to indicate 24-hour availability from 12:00 am to 12:00 am.

What's New?

  • 24-Hour Availability: You can now set your availability from 12:00 am to 12:00 am, indicating continuous availability for a full 24-hour period.
  • Extended End Time: End times can now be set to 12:00 am with any other start time. Previously, the end time was restricted to 11:55 pm, which could lead to the last slot not being displayed. With this enhancement, for a calendar duration of 15 minutes and 15-minute intervals, the last available slot will now be correctly shown as 11:45 pm, ensuring users do not miss out on desired appointments.

Important Note:

  • Users can only set 12:00 am to 12:00 am as the same start and end time for 24-hour availability. Setting identical start and end times for other hours, such as 8:00 am to 8:00 am, will not be allowed. In such cases, for example, users should set availability for the period from 8:00 am to 12:00 am on Mondays and from 12:00 am to 8:00 am on Tuesdays.

How to Use?

  • Navigate to calendar settings.
  • Select 'Availability'.
  • Choose your preferred days and time slots.
  • Add your availability accordingly.
Jan 23, 2024

About the enhancement

Introducing an exciting enhancement that empowers users to effortlessly handpick up to 10 recipients in the Connect Call action within the IVR system. This innovative capability initiates simultaneous calls to all selected users, persisting until one of them answers.

By expanding the outreach to multiple users concurrently, this feature significantly elevates the likelihood of promptly addressing the caller's needs, especially when other recipients are occupied. The result? Amplified lead conversions and an enriched user experience, as missed opportunities dwindle, and connections flourish seamlessly.

  Minor Bug Fix

In the IVR Gather Input action, earlier the call used to get disconnected when no input was provided. This has now been fixed  

Jan 18, 2024

We are thrilled to announce some exciting UI changes in for the Text Editor!

This document will take you through all the functionalities of the new editor.

  • When "Custom Values" icon is clicked it will populate all the options from where you can select the custom values for the template.
  • By clicking on "Trigger Links" you can select from the links available in the dropdown to add in the template.

Below mentioned functions are highlighted above

  • screenshot
  • Undo
  • Redo
  • Bold
  • Italic
  • Underline
  • Font Type

Below mentioned functions are highlighted above

  • Font Size
  • Paragraph Format
  • Line Height
  • Text Color
  • Background Color
  • Disc List
  • Decimal List
  • Text Align

On clicking the more options icon (3 dots) you will be able to select from the below mentioned actions

  • Strike
  • Super Script
  • Sub Script
  • Code
  • Code Block
  • Block Quote
  • Format Selected
  • Format all document

When the "Add Link" icon is clicked a new window will open. In this pop up window you can paste the URL or select a trigger link by clicking on the icon in the right. Select the "Action: from Self or New Window and click on Save.

When the "Image" icon is clicked a new window will open. In this pop up window you can:

  • Add URL of your Image
  • Upload the Image by clicking on the "Upload" button
  • Set the Width and Height
  • Enter an Alternative Text
  • Enter a link you want to open when user clicks on the Image
  • Open Link In - This field is only editable if "Image Action Link" is selected. You can select the link should open in same or different window.

When the "Source Code" icon is clicked a new window will open. In this pop up window you can see the Source Code for the template and edit the same.